
Hey guys! Happy New Year! (Sorry for the late greeting—whoops! I guess at this point, it’s past Chinese New Year now, haha.)
Welcome to the first blog post of the year. While the start of the year feels fresh, it feels like it’s already been a month with all the events happening both in my personal and professional life AND with all the world events going on. I can’t believe it’s just been a couple of weeks in the year!
Anyways, I’ve been keeping myself busy. The last time I’ve posted here was November. Shortly after that post, I decided to make a crepe cake for my family’s annual Christmas potluck. (A little backstory: I’ve gone to a crepe cake class last year and know that making a crepe cake is no easy task!) My aunt suggested that I practice before Christmas Eve to decrease the chances that I will mess up so that I’ll know what I’ll be getting myself into. I took her advice and make a vanilla crepe cake.
Man, it took me a solid six hours to make it! There were some bumps along the way, but it turned out light and delicious!
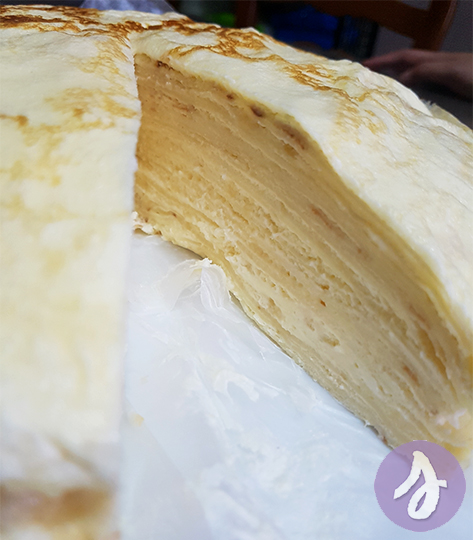 Just look at those layers!
One month later, I bought all the ingredients needed to make the crepe cake again for Christmas. I decided to replace sugar with agave and vanilla extract with vanilla bean powder for a healthier option. Honestly, I was worried about the new adjustments to the recipe—I hoped that it wouldn’t alter the taste too much.
And since I was making it for the second time, I decided to kill two birds with one stone and make a blog post for it (so here we are, haha.)
 Ingredients are prepared (and scattered, I may add.)

The first step was to combine all the ingredients needed to make the batter. I learned that crepe batter (at least for crepe cakes) are extremely watery and thin. This is because you need the crepes to be as soft and as thin as possible to make it ideal for stacking and eating. Crepe cakes are otherwise known for their soft and melt-in-your-mouth kind of texture, after all.
Once the batter was finished, I left it in the refrigerator for it to cool while I prepared the cream:

See the little specks of black? I used vanilla bean powder instead of vanilla extract for this cake! It really enhanced the flavor and the smell—mmm!
Once the cream was ready, I covered it with cling wrap and left it to cool at room temperature while I prepared the whipped cream:

After making the whipped cream, I left it in the fridge to set and combined it later with the custard cream once the temperatures of both were somewhat equal.
Now that all the parts of the cake are ready, the most tiring and time-consuming part is up next: cooking each crepe layer. The recipe I’m following says that it’s good for a 22-25 layer cake—which makes a decent serving for a party!
 Here we go!
As each layer takes roughly 3-6 minutes to cook, I tried to keep myself busy by working in the kitchen. Unfortunately, it wasn’t a productive afternoon because I kept glancing at the pan from time to time to check if the crepe was ready!
 It’s already 7PM and I’m still making the layers, haha. Note that I started around 1:30PM!
After 6 painstaking hours standing and making all the elements for the cake, it was time to put it all together:
 Sitting down after so long is so rewarding!
It was time to stack the crepes up! At this point, I was exhausted and tried to finish the cake as neatly as I could.
 My brother took this photo for me—thanks, Kyle!
The last time I made crepe cake, we ended up eating around four stand-alone crepes before I stacked them up into a cake, which resulted with leftovers of the filling. For this batch, we behaved ourselves and was able to use every single bit of both the batter and the custard cream! Yey to no waste!
 At this point, I was too tired to really care if the photos are good or bad, hahaha.
I’m done—yey! I finally placed the cake in the fridge and cleaned up at 8PM before heading to my room for some well-deserved rest.
The next day, after we had our Christmas lunch, I brought out the cake and sliced a piece for everyone and it tasted great! (In fact, it tasted even better than the first batch I did!)
 I took a bite before I realized that I didn’t take a photo of the finished cake, haha!
My family was impressed with the cake, but I don’t see myself making this again any time soon, haha. After making one of these, I completely understood why crepe cakes are more expensive than regular cakes.
Mad respect to people who make crepe cakes on a regular basis. Crepe cake making is truly a test of patience, but the end result makes all the effort worthwhile! (Also, am I making it wrong? Why does it take me 5-6 hours to make a single cake? HAHA.)
That’s pretty much it for today’s post! If you’ve made it this far, I just want to thank you (yes, you!) for reading my stories and sticking around—can’t wait to write more this year!
‘Till the next blog post,
Sophie 🙂

Leave a comment